|
|
|
P A G E T H R E E O F F O U R |
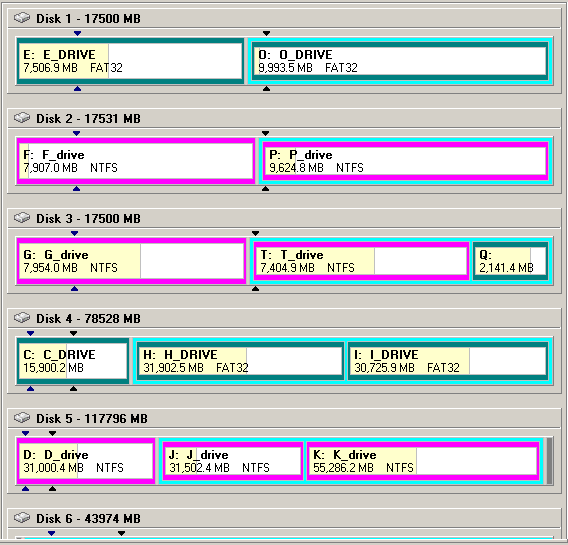
The best way to understand how partitioning works is by viewing partitions graphically. Posted here is a screen-shot taken from Partition Magic. Here you see 6 hard drives. [Actually, you can't see all of Disk #6.] The first 3 disks are SCSI. The last 3 are IDE/ATA. The legend for this graph is posted here. Notice that Disk #3 contains both NTFS and FAT32 partitions. Notice,
too, how multiple logical DOS drives are always enclosed
with-in extended partitions [light-blue outline]. This is a trick you can use when adding a new hard drive to your system.
If you partition a newly added hard drive so it contains no primary partitions
(only Logical DOS drives within an Extended partition) ..
Two Common Problems1. Not using the entire amount of the disk. For example, after partitioning your 120-GB drive into 3 equal parts [you thought], you find you're only using 80 gigs. To avoid this problem:
2. After partitioning, you later discover one of the partitions didn't "take" [for whatever reason]. As a result, you end up formatting the wrong drive, and losing valuable data. Obviously this is bad, bad, bad. To avoid this problem:
Drive LettersWindows assigns drive letters like so:
The thing to note here is that *all* Primary partitions receive drive letters before ANY Logical DOS drives do. |
P A G E T H R E E O F F O U R |
|
You will lose all data in the partitions you format. [In the section labeled Data Recovery below, you will find a list of programs that might help if you accidentally partition or format the wrong drive.] Write down this drive-letter information on a piece of paper. Another method to avoid formatting the wrong drive is to use descriptive drive labels. At the completion of formatting, the program will ask you if you want to label the drive. If you don't, it will automatically assign some arbitrary, meaningless label for you. It's better to label each partition yourself. Use something that makes sense to you, such as: C_drive, or D_drive, etc. Letter-based labels can become confusing if/when you add more hard drives. Your F_drive, for example, might become your G_drive or H_drive when you add another hard drive later. But you can always change their label. I tape a 3x5 card to the side of my monitor. It contains all partitioning info, in a single glance. A third trick to keep from formatting the wrong drive is to make all your partitions unique sizes. For example, if you have two 60-GB drives, instead of creating three 20-GB partitions on each drive, you might make one drive: 15-GB, 20-GB & 25-GB, and the other 12-GB, 18-GB & 30-GB. This would make it difficult to confuse your partitions, and easy to tell them apart. If you need to reformat a particular drive, and that drive is supposed to be 18-GB, but it's being reported as 25-GB, you know something isn't right. Lastly, you should *always* have a back-up image of your boot partition(s) on hand. You can create a back-up image with an imaging utility such as Symantec's Norton Ghost, or Powerquest's Drive Image. If you need help with creating an image of your boot drive/partition, check out the world-famous Radified Guide to Norton Ghost. This way, if you ever accidentally wipe out [re-format] your boot partition, you can quickly & easily restore it .. in a matter of minutes. You shouldn't be without an imaging utility. They can save you from so much grief. One of the tools that comes with Partition Magic, called DriveMapper, can help in the event the installation of a new hard drive causes drive letters to change on existing drives/partitions. From the Partition Magic Help file:
If you install your OS to a SCSI drive, before installing any IDE drives, and make it your *active* partition, the primary partition on your SCSI drive becomes your C: drive. If you later add an IDE drive, your SCSI drive will remain your C_drive, even tho you have a primary partition on your primary-master drive. I have never done this, but this is what I've been told. For more info about drive letter assignments, see here (annoyances.org). A freeware letter-assigner is posted here (I have not tried it). Ed K. from Topeka, Kansas writes to mention a free utility named COA (Change of Address). He says:
On the last page, we'll take a look at some final points, such as the advantages of NTFS over the FAT32 file system, formatting, data recovery, GDISK, and some other miscellaneous items.
|